

Zebra Head
Oooh hello there!!
It's been a little while since I last got around to posting, but Dennis has definitely been holding down the fort!
I've been so insanely busy at work, working up to our opening night here in Oberhausen Germany. Work has been occupying every ounce of energy I have, so it has been insanely important


 xxx
xxxChunky Doily!
Sunday, 30 October 2016
As a crocheter, it is my duty to crochet as much as I can and start as many projects as I can without finishing the ones I was working on. That's how I role. That's just the kind of crocheter I am.
You might be reading this and thinking, nope, not me, LIAR! All it takes sometimes, is a little look on Pinterest, to make you forget all about what you were working on! Yes, Pinterest is a dangerous place to be for a crocheter. If you don't have any self control, you'll never finish a project in your life!
 |
| Got my faux fur rug! |
Now, in my case, things aren't that bad. I still manage to pop out some actual finished items from time to time! Which is what I did yesterday! I was walking through the city with our little Pops (I call Poppy: Pops from time to time, I'm that kind of a dog owner) on the lookout for some nice props for all the photos we take of our work. My mind was set on a faux fur sheepskin rug or something like that. You know how whenever you need something, and you think you've seen it in every shop, they don't sell it anywhere?! Well, it was one of those days.
Book Review - Learn To Crochet Love To Crochet
Friday, 21 October 2016

Today we're featuring our very first Book Review! It's quite exciting as it's something we've never done before! We were contacted by the publishers of this book a while back, asking if we were interested in reviewing this book and we thought it would be a great idea!
We LOVE crochet books as they are a great inspiration to us! There will always be some patterns in there that trigger your desire to crochet something! New yarns to discover, new stitch patterns, you name it!
Now just because we were sent this book, doesn't mean we were paid to say certain things about it! We wouldn't feel right about saying things we don't fully stand behind.
The book we're reviewing is "Learn to Crochet, Love to Crochet" by Anna Wilkinson.
How To Crochet A Simple Coaster
Tuesday, 18 October 2016
Good day everyone!
I'm back with another quick pattern for you guys! This one is even easier and was actually born out of necessity.
I think that's the great thing about being able to crochet. Once you have some experience with crocheting, it gets easier and easier to make things without a pattern at all. Take this next pattern for example: Coasters. I needed some coasters, so I crocheted some coasters. I could have gone online and probably found about a 100 similar patterns, but I felt like making and creating them all by myself! There's something so very satisfying about turning a ball of yarn into a useful product all by yourself! Don't you guys think? Do you ever look at a finished item and say to yourself: You used to be just yarn!
If you want to be the first next time to be notified about a new video we've posted, make sure to Subscribe to our YouTube Channel :-)
Crochet Star - Video Tutorial!
Friday, 14 October 2016

Hello lovelies!
I hope you guys are well! In Germany, the weather has suddenly changed from "Too hot to wear a t-shirt" to "Where are my gloves?!". Since we don't own a car, we do everything by foot or by bicycle and we really need to dress nice and warm for this weather. It's the perfect excuse to get our homemade scarf collection out and start wrapping ourselves in all that yarny goodness!
The moment I feel the weather change, my thoughts go straight to Christmas. I know it's a little premature at the moment, but since Christmas is my favourite time of the year, I already can't stop thinking about it. I have to restrain myself from going to the basement and getting at least a few decorations out already! Christmas lights are my favourite ;-)
The weather makes me want to light every candle we have in the house, burn some incense, put on my super warm house shoes and wrap up in a nice woollen jumper on the sofa!
Happy Chicken Doorstop!
Sunday, 9 October 2016

Hello there lovelies!
Since we have our beautiful craft room all set up (we mention it in our latest Vlog), I've been way more inspired to use our sewing machine a little more often. It always used to be quite a hassle getting it out of the cupboard, getting an extension cable (our dining table didn't have a socket nearby), connecting the cables, getting the fabrics from another box, etc... Some people might be fine with that, but since I'm a tiny little bit (hugely) lazy, I ended up not using it very much.
Picture Frame Upcycle!
Wednesday, 5 October 2016

Did we mention that we have a craft room now? I feel a little spoiled writing this, but it's so AWESOME to have a craft room!
Since we never had a craft room before, we don't really have lots of stuff to fill it up with, besides all our yarn, fabric, needles, more yarn, did I mention yarn? etc...
After everything was organised in the room, it became very clear that the room looked sad and empty, which are probably the worst qualities a craft room can have. It needs to be colourful and inspiring! It needs to be a space that motivates you and inspires you to be creative! A space that keeps changing depending on your mood, interests and colour vibes!
In Bed With Boys & Bunting - Episode 5
Sunday, 2 October 2016
Hello Lovelies!
We can't believe it's been almost 5 (!!) months since we last uploaded a VLOG!
Looking back though, we've been so incredibly busy with so many things!
From packing up our old house, moving to another city, going on a long holiday, moving more stuff, Dennis visiting his family in Spain, Matt rehearsing full time, etc... it's no wonder we've had very little time for our favourite hobby: crochet, crafting and working on Boys & Bunting.
Thank you guys so much for sticking around and supporting us, even though we couldn't give you as much attention over the last couple of months as we've wanted to!
Anyways, enough excuses! Grab yourself a big mug of tea/coffee/whisky and come crawl into bed with us:
Introducing: ZABBEZ' Flower Dolls!
Wednesday, 29 June 2016
Hello you lovelies!
As I'm writing this, I'm sitting in front of the window in our living room. The sun is slowly starting to set but it's still very bright outside. The flowers on our balcony look extra pretty in this late sunlight. They look so pretty that they could inspire you to start crocheting, for example something flowery, like... a flower doll perhaps?
Well, it might have inspired us, but we didn't do it. However, we want to share someone with you guys who did exactly that! This man took his inspiration from beautiful flowers and turned them into crocheted dolls! A doll and flower in one! What's not to love?? Did I mention it's crocheted? And flowers? And dolls?
Yarnit
Tuesday, 14 June 2016
Hello there lovelies!
How are you all doing?


How are you all doing?
A whole month has passed since we last posted, a month that has just flown by!
We have both been so insanely busy that it's been near impossible to do all that we'd hoped. Blog, work, walk Poppy, dog training with Poppy, clean, shop.... you know the drill!
It's all been a tad too hectic, so we had to take a little bit of time to let things calm before we could get back on track and back to blogging.
So thanks for waiting for us!
Once again we've both got so many ideas lined up in our heads. Project ideas, as well as post ideas! We are just trying to figure out when and how to share them with you all.
For now though we're back with a post all about a product that we feel is not only pretty cool, extremely functional, but we're also sure that it is a product that many of you would be more than interested in....The Yarnit!!!

Now, we were first introduced to the Yarnit!!! a few weeks ago by the very lovely Kate Sullivan.
Kate is the very clever lady behind the Yarnit....she invented it!!!
Kate told us all about her product and just hearing the name, we new that it would be something that we would love.

So what is the Yarnit and why do we think it's a useful crafting product?
The Yarnit is a nearly indestructible globe that keeps your yarn safe and protected from dust, dirt, pets, and accidents. The dome shaped body of the Yarnit keeps your yarn by your side so there is no more chasing it across the floor whilst working on a project.

At the base of the Yarnit you will find a special rubber platform that grips securely to all surfaces and doubles up as a little storage area. It's perfect for a small pair of scissors, stitch markers and darning needles.
We like that feature a lot as we are forever losing our scissors and markers!

Now this version of the Yarnit, is the original size. It's a great size for smaller projects to take with you on the go.
It comes with a strap so you can carry your projects with you. The Yarnit also fits the size of a cup holder in a car, so it's perfect when crocheting as a passenger (No more yarn bouncing around the dirty foot mats of the car!)

Another great feature is that the top of the globe has needle docking slots to keep your needles and hooks protected, as well as keeping your stitches safe on your line when you are taking a break from your project (great for you nifty knitters!)

We must say though...
The best thing for us is that it fully protects our yarn from the ferocious mutt that we call Poppy!!
She loves to chase the bouncing yarn around our feet as we're crocheting. This way we don't have to go through the battle of removing the yarn from Poppy's clutches and no longer run the risk of damaging the yarn.

As you can see we are very happy with out Yarnit. It really is a fantastic product.
Now I know that some of you had questions about the size of the Yarnit. Maybe a little small for some of you? Well here's the good news...
Kate has been working on a new version of the yarnit, it's much bigger and aptly named BIG SULLY!
Of course coming up with a new version, takes time and money so Kate has started a Kickstarter campaign to raise the funds in order to develop and produce her new version of the Yarnit.
The new version of the Yarnit will include:
- 7” globe, large enough to accommodate a full skein of most yarns without having to ball or cake them first! (Great for those who like to work from the center pull)
- Multiple yarn holes to for chunky or fine yarns
- Interior sectional insert so you can use multiple 50 gram balls, perfect for doing color work
- Needle docking slots for all needle gauges, hook sizes 2 to 17!
- Original Yarnit base with accessory compartment
- 6" ruler included for those quick measurements!
Sounds pretty cool right?
So if you like what you're seeing why not pop over to the Kickstarter page and have a look at Kate's ideas and support her campaign. We're sure that you will like what you see. Alternatively visit Kate over at her webpage, www.theyarnit.com.
We love Kate's products, it's nice to see a product designed by a crafter with fellow crafters in mind. The attention to detail is obvious we give it a definite thumbs up!
Until next time....

(We did not get paid to write this review, however we did recieve a free version of the Yarnit and just had to share it with you all)
Granny Square Blocking Station
Friday, 6 May 2016
Hello everyone! 


I didn't paint Poppy! She just happened to wear a matching outfit! 
I'd like to start this post by thanking ALL OF YOU! You've been so very kind and showing us so much love after our announcement of being engaged!
It really spiked the already insanely happy state we were in! To know that so many of you are so happy for us is just the cherry on the cake!
In case you haven't seen our video, why don't you click here to see what I'm talking about ;-)
Now on to the thing many of you have been asking about. My Granny Square Blocking Station!!!.
Say what?! Yes, here at Boys & Bunting we block our Granny Squares!

Now when making a blanket made out of granny squares, blocking is often not really crucial, as the squares will pretty much 'auto-block' when they're joined together.
So why come up with a blocking station you might ask? Well, being crafty is not always about things you need, but more about things you like. I like to block the squares for the blanket we're working on because it makes the piles so very very neat and makes all the squares look exactly the same! It makes it easier to lay them out and organise the colour layout of the blanket.
It also happened because when we started making these squares, Matt's tension turned out to be a lot looser than mine which resulted in bigger squares. I went up a hook size, and adjusted my tension as much as I could but my squares were still a little smaller. The blocking station totally fixed that issue.

So what's the big deal? IS there really much difference after blocking? Well, it's not a HUGE difference, but your granny squares are definitely square afterwards! Here you can see the difference:

So far we've only dry blocked our squares. We put them on our GSBS (granny square blocking station) and let them sit there overnight, or as long as you want. When we take them off, they're blocked. This works because it's cotton and cotton tends to change shape quite easily. When using wool you might want to spray your squares with some cold water as you put them on the GSBS. We haven't tried blocking acrylic ones yet, but I'm pretty sure the GSBS will do the trick as well!
So how does one make this "Granny Square Blocking Station"?
Well, it really is very very easy. Now you might think to yourselves: "well, easy for you maybe". No, not just easy for me, easy for everyone. I have pretty much never in my life held a drill or worked with wood. Matt's usually the done doing stuff around the house. So if I can do it, you can too!
Let's get on with the instructions:
How to make your own Granny Square Blocking Station
Materials
I went to the DIY store to buy some wood, some dowel, a paint brush and a little saw (to cut the dowel). At the wood section they had a sawing service where they also sold left over cuts of wood. One of these boards turned out to be perfect, it only needed to be sawed in half to get 2 perfect squares (I only needed 1). You could however also use wooden chopping board, or any piece of wood that is thick enough. I'd say around 2.5 cm (just under an inch) since it needs to hold the dowel steadily.

The pieces of dowel were 5 mm wide and felt quite strong. I needed enough dowel to make 9 pieces of 20 cm each. Mine were 1 meter each, so I needed 2.
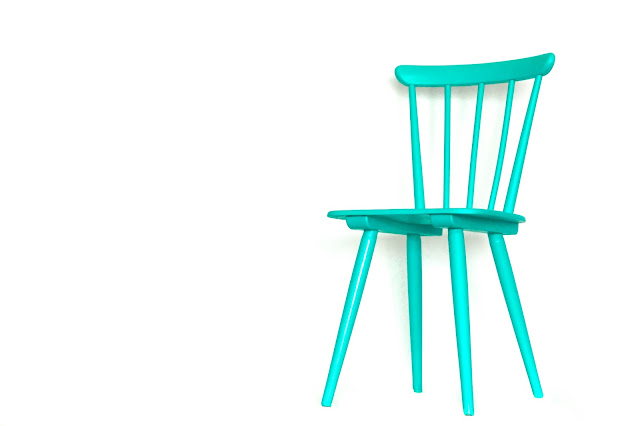
We still had some paint at home from when Matt upcycled a chair he found on the street. A lovely and bright aqua-turquoise color! It totally reminds me of the Caribbean.
Preparation
I sanded the ends of the dowel to make them nice and smooth, i also sanded the entire wooden board, especially the edges.
I then measured my granny squares, which were just under 8 cm. I decided to go with 8 cm so they would stretch a little bit.

Using a ruler I found the center of my square board (I drew 2 diagonal lines across the board) and drew the first marking there. Then I drew marks 8 cm to the left, right, top and bottom of that mark. I then added the last 4 markings in the corners, obviously always keeping the 8 cm distance from the other marks. If my lines and markings look messy on the pictures, it's because I rushed this project so badly! The thing was finished within 40 minutes. It's still pretty accurate though ;-)
Drilling
Now on to the drilling! I used a 5 mm drill since I was using 5 mm dowel. The drill is as cheap as it comes, as it's an Ikea one that works with a battery. It drills so slowly that I was lucky that the wood wasn't very hard, since even with a full battery, I had to push on the drill as hard as I could to even get through the wood. Before drilling, you need to to know how deep you can drill. The easiest thing to do is to hold the drill end against the side of your piece of wood to see how far you can go without going through the wood. I drilled about 1.5 cm in leaving 1 cm "undrilled". You can mark your drill by adding a thin piece of colourful tape on your drill at the point where you should stop. This way you will never drill deeper than you should!

Now drill those 9 holes! Make sure you hold your drill as straight as you can, since you don't want the pieces of dowel to be crooked afterwards!
After you're done drilling, check if your pieces of dowel fit inside the holes. It should be a very tight fit, but if it really won't go in, sand one end of the dowel down a little bit more until it fits. I didn't need to do this. It was very very snug!
Finishing
You can leave your blocking board as is, but I decided to give it a nice coat of paint! Like I said before, I chose this beautiful fresh color which is a paint and varnish in one, with very high coverage and also very quick drying. When I was done painting, it was pretty much dry already. I painted the entire board with the dowel in place. I was scared the paint would fill the holes too much and the dowel wouldn't fit inside anymore. I also didn't plan on taking the dowel out since it's not meant to be an adjustable blocking station, so I was fine with the paint gluing the dowel in place. I didn't do a great job painting the sides of the board, and didn't bother with the bottom as well. But I'm very happy with the outcome.

I hope my instructions were clear enough so that you TOO can make a Granny Square Blocking Station! If you do end up making one, please tag us on Instagram with @boysandbunting and #boysandbunting so that we can see your work!
If you have any questions, send us a message either through the blog or through our Facebook Page

Have a lovely weekend everyone!!!
 xxx
xxx
In Bed With Boys & Bunting: Episode 4
Tuesday, 3 May 2016
Hello Lovelies!
We do hope you are all having a marvellous start to May?
So happy that it's starting to brighten up and more often than not the sun has got his hat on!
We're back with another "In Bed With Boys & Bunting!!"
So go grab your current project, a massive mug of tea and join us as we natter away for the next half an hour or so!
Some Links and Info from Episode 4
Matt finished off his turquoise baby blanket. What a "life saver" blocking is!!!
He's really happy with how it turned out and over the next weeks will (hopefully be able to) figure out a pattern for this cute little blanket.
For those of you that are interested and may have missed the post, here's Matt's post with all of the information about the blanket.

Our current W.I.P!
We are working on this blanket together and making tons and tons of cotton squares to join together.
We haven't quite decided how we are going to join them yet, so any ideas would be greatly appreciated?
We are very excited with how this blanket is coming along, It's so nice to be working on a project together!

Dennis' spot of D.I.Y has produced a rather fun and functional little gizmo for blocking our Granny Squares. It's perfect for blocking many squares at once and doubles up as an easy way to store the squares, until we join them.
Dennis will write up the details of how he made his "Granny Square blocking device" over the next days, so that you to can join the perfectly formed Granny Square revolution!!

You may have noticed that the "Granny Square blocking thingy" is the same colour as the chair in our bedroom. That's because Dennis used the left over paint from this chairs upcycle. To read all about the transformation of our beloved bedroom chair, you can follow the link here.

Finally Dennis asked the "BIG" question and Matt said a whopping great "YES!"
I guess we'd better get crocheting....perhaps something like this crocheted wedding bouquet that we made for our friends wedding? Or a little ring carrying harness for Poppy to wear? Oh the possibilities are endless!!! :-)


We hope that you enjoyed our fourth instalment of "In Bed with Boys and Bunting"?! If you have questions that you would like to see featured in future episodes then simply send us a quick note.
Also if you like what you're seeing in our Youtube videos, don't forget to subscribe. This way you'll be notified when we next upload a vlog episode or tutorial.
Unitl next time...
Subscribe to:
Comments (Atom)
